Audiotuts+ Updates - Quick Tip: Side Chain Compression in Ableton Live 8 – Part 2 |  |

| Quick Tip: Side Chain Compression in Ableton Live 8 – Part 2 Posted: 06 Dec 2010 12:00 AM PST In Part 1 of this tutorial which can be found here, we examined a couple of uses of side chain compression and demonstrated how this method can assist and enhance your mixing experience. Specifically, we looked at how we can sidechain a single signal and also used an effect rack on a return channel and a neat Utility plugin trick to apply compression to multiple signals. In Part 2, we are going to examine two ways of ducking only a selected frequency range and also how to compress a “busy” signal. The Ableton Live version being used is 8.0.9.
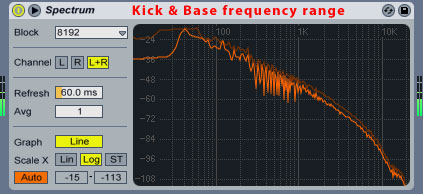
Step 4: Ducking a Frequency RangeTill now, our bass synth’s volume lowers down when the kick drum is heard. Drop a Spectrum device on the master channel and observe the lower frequency range. Solo the Bass channel, then the Drums channel. On the drum channel just go on and solo only the kick drum for the time being. Then CTRL + click both solo button to listen to both channels (Drums and Bass) playing together while looking at the Spectrum display. Between the range of 30-300Hz both sounds are "fighting" for a place in the frequency spectrum. We’re going to use a Multiband Dynamics native device on the bass channel to split the channel frequency range signal into three ranges, Low, Mid and High.


 Create another Return track and drag a copy of the Audio Effect Rack from the Sidechain return track to the newly created one and rename the device and the Return track to Frequency Selected Multiband. Just CTRL(CMD) the Audio Effect Rack then click and drag to the newly created Return track, then drop it in there. Group the Chain where the compressor is thus creating another Rack in that chain.
 Temporarily deactivate the side chain compressor and drop a Multiband Dynamics device before it. Drag the Amount knob down to 0 to turn off any compression that the device may apply on the sound. Set the Low-Mid crossover all the way down to 30Hz (control located underneath the Low button). Set the Mid-Side crossover all the way down to 300Hz (control located underneath the High button). Now group the device in an Audio Effects Rack by CTRL(CMD)+G or by select Edit->Group. An Audio Effect Rack is created with our current Multiband Dynamics device located in the first chain. Show the Chain List and rename the Chain to Low(CTRL(CMD)+R to rename). Solo the Low band by selecting the “S” letter next to the Low-Mid crossover display. Duplicate the Low chain by CTRL(CMD)+click the drag it underneath itself to create a copy or select Edit->Duplicate. Rename the resulting Chain to Mid and solo the Mid band. Do the same again, duplicate the Mid Chain, rename the resulting chain High and solo the High band. Delete the Compressor from the Low and High Chains since we only want to affect the Mid one. The Low band goes from 0Hz to 30.0Hz, the mid band from 30.0Hz to 300Hz and the high band from 300Hz to whatever your sound card or sample rate supports. While the bass is auditioned, solo each Audio Effect Rack Chains one by one to hear each frequency range. Obviously the Low range would be almost inaudible. Now, drag the side chain compressor and drop it just after the Mid Chain of your Effect Rack. Activate the side chain compressor.
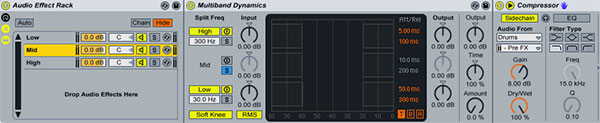 Great! Now, in our case the Send C control for each track would be responsible for compressing any signal between 30Hz and 300Hz each time the kick drum activates the side chain compression for the Return C. So by increasing the Send C value for our Bass track effectively we are compressing the signal between those frequencies. Have a look at the source files where I have renamed channels and Return tracks appropriately for your own convenience (sidechain-compression project).
 Splitting the frequency range of a signal has many useful and creative uses. For instance, you could apply a Utility plug in on the Low end of a signal to make it mono or apply a distortion effect on the high end for that extra grit. Listen to the result with a percussion loop added on top: Download audio file (electro-loop-multiband.mp3) Step 5: Ducking a Frequency Range Using EQI am going to show you another way to split the frequency range using EQ. Drag a copy of our previous Side chain Compression device located on Send B to a new Send D Return track. Rename the device and the Return track to Frequency Selected EQ. On the Compression Chain drag an EQ8 device before the Compressor. Activate the first EQ8 filter, set the mode to Low cut and dial in a frequency of 30.0Hz. Similarly, activate the second filter, set the mode to High cut and dial in a frequency of 300Hz. Rename the Chain to EQ-30-300Hz for convenience. Drag a copy of the EQ8 device to the chain above named Invert where the Utility device is located and drop it before the Utility device. By increasing the Send D value for our Bass track effectively we are compressing the signal between those frequencies using our EQ8 device now. The inverted EQed signal on the first rack is being mixed with the original one being sent though the track Send, subtracting the spectral range we’ve selected on our EQ8 from the original signal leaving all other frequencies in tact (300Hz and higher). By adding our EQ8 on the second chain we mix in the missing frequencies back to the signal. When the sidechain is activated it compresses the range between 30Hz and 300Hz being selected from our second chain leaving us with the signal that needs to pass through!
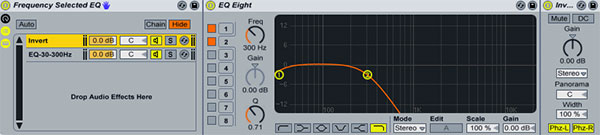
 This way we can have more control on the spectral range that our input signal can affect since we can curve out any frequency range we want. Of course, you can use any other EQ plug in of your choice. Listen to the result: Download audio file (electro-loop-eq8.mp3) Step 6: Ducking from a “Busy” SignalCurrently our side chain input signal is coming from only the kick drum. What if we had a drum loop mixed with other percussive elements like hi hats and other percussion? We would need to isolate the spectral range around the area where the kick drum is heard so that we would be able to apply that range as an input signal. In the sidechain-compression-busy project folder, I have exported our previous drum loop without the synth bass and the white noise loop. Listen to the loop: Download audio file (mixed-down-loop.mp3) Drag a compressor on the Bass with settings taken from Step 2 activating Sidechain and setting the Audio From drop down to Drumloop and Pre FX to the one underneath. Activate the EQ button and select the Low pass Filter Type. Dial in 30.0Hz on the Freq knob, set a value of 0.30 for Q and drag the Gain all the way to 24dB.
 We’ve effectively narrowed the input signal’s spectral range so that only those selected frequencies can have an effect on our compressed signal. Of course, all previous techniques can also be incorporated in this example. Listen to the final loop: Download audio file (sidechain-compression-busy-final.mp3) So there you have it. By combining all of the above methods you gain extreme control on how various input signal can affect others through the mixing process. Have a look at the source files for assistance. I have also included device presets so you can drag and drop them to your Return tracks and start working instantly. They are located inside the Return Effect Devices folder.
|
| You are subscribed to email updates from Audiotuts+ To stop receiving these emails, you may unsubscribe now. | Email delivery powered by Google |
| Google Inc., 20 West Kinzie, Chicago IL USA 60610 | |
No comments:
Post a Comment