Audiotuts+ Updates - Quick Tip: Customising Drum Kits in Superior Drummer |  |

| Quick Tip: Customising Drum Kits in Superior Drummer Posted: 29 Nov 2010 12:00 AM PST The more you play around with Toontrack’s fantastic Superior Drummer plugin, the more you’ll find yourself wanting to hybridise your kits. I find that no matter what I do with Superior Drummer’s otherwise excellent Avatar kit, the kick and snare sounds never quite satisfy. On the other hand, I really like the snare and kick from the entry level Pop/Rock kit, but the cymbals lack the expressive range I want. While I love the pinging “konk” of the metal snares in Drumkit From Hell, I hate everything else about it.
Fortunately, thanks to Superior Drummer’s X-Drum feature, there’s no need to run separate instances of the plugin just to get that one great sound you want from another kit; you can just plumb them straight in to your regular kit, and even trigger them with the same MIDI command, which means you can work with ease on existing tracks – no fiddling with the piano roll required. Here’s how: Pick Your KitNaturally enough, you need to pick one kit as starting point. I find that trying to piece together an entire kit made from disparate elements of various drum packs starts to sound messy, so it’s best to begin with something that requires the least amount of alteration. In my case, I’m going for the Avatar kit, because the cymbals and toms sounds really nice. Turn Off What You Don’t Like
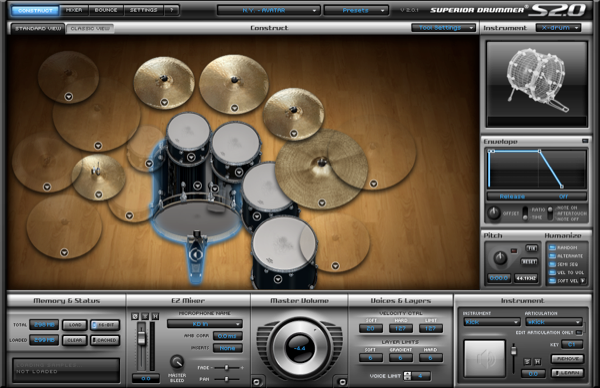 The next job is to decide which bits you want to replace. In my case, it’s the kick and snare – the Avatar options are far too polite for my tastes – so I’m going to turn them off completely, just to avoid any confusion and reserve system resources. Using the drop-down selector menu on the drums in question, select “None”. Raid The Cookie Jar
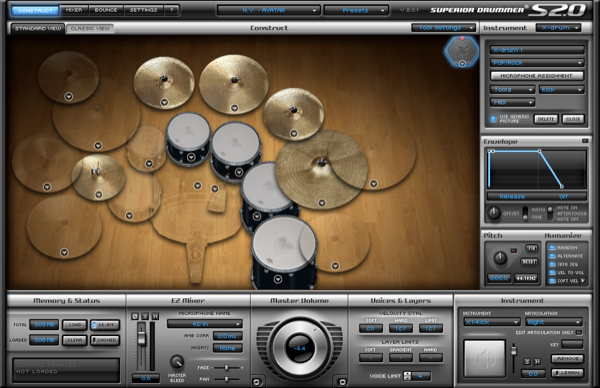 You probably already have a rough idea of what samples you want to use as replacements for what you’ve taken out. If not, there’s no need to worry about loading entire expansion packs for audition purposes: just go to the X-Drum drop-down menu on the right of the Superior window, and select “New”. To keep things tidy, I check the “use generic icon” radio button, giving me a little pad icon rather than the full drum graphic. In the top drop-down menu, select the drum library you want to audition and, in the drop-down below and to the right of that, select the type of drum or cymbal you want to test. Using the drop-down on the pad itself, you can select the individual sound, e.g., 14” Ludwig or 12” Sonor. Click on the pad icon to hear it. To add another drum pad, go back to the first drop-down and, again, select “New”. You’ll see that, in the bottom of the menu, an item will have been added called “X-drum-1”, and each successive new drum will be added following the same convention. Use this to switch between editing the new drums. Sort Out the TriggersHaving got the sounds you want, it’s just a matter of setting the X-Drums to trigger with the same MIDI trigger as the drums they’re replacing. Select the X-Drum you wish to assign and, in the MIDI drop-down, select “Steal Default”. This will assign the new drum to the same MIDI trigger used by the one you removed. So, for example, doing this with X-drum-1, which I have set to be a snare, will assign it to D1, which is where the default Avatar snare would be. In some cases, some of the articulations may not transfer to their expected triggers, as they’re not the same on all drums. No problem, though: just select the x-drum you wish to edit from the drop down on the Instrument panel (bottom right window), select the articulation and manually set the MIDI key.
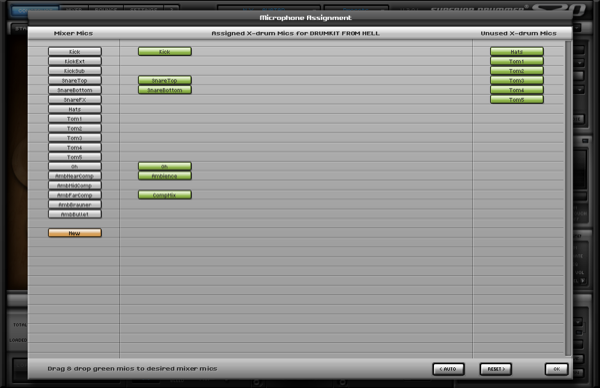
 If necessary, you can even re-assign microphones via drag and drop by clicking on the Microphone Assignment button.
 Get Your Groove OnJob done! You should find that everything – Superior’s built in mixer, running out to multiple channels in your DAW – work as normal. Of course, depending on the extent to which you use the bleed functions, you may encounter the limitations one would expect when using, effectively, multiple, separately recorded kits, but this is a relatively minor limitation.
|
| You are subscribed to email updates from Audiotuts+ To stop receiving these emails, you may unsubscribe now. | Email delivery powered by Google |
| Google Inc., 20 West Kinzie, Chicago IL USA 60610 | |
No comments:
Post a Comment